Thursday 27 December 2012

20. Finalising My Logos

Clothing and Final Logos

I'm not sure if I have a final logo yet, but so far I'm happy with how it looks on the hoodies and T-shirts. I simple used some basic vector images and copied my logo unto to them. I also tried to add some shadow effects to the t-shirts to make it look more realistic. Here's how my t-shirts and hoodies turned out:

As you can see, they turned out quite well. The style of the T-shirts are very simple and wearable.The look of the logos on the shirt also makes it look slightly more appealing and trendy. At moment, I'm very happy with the way my hoodies look and the black designs of my T-shirts. The black designs look more urban and unisex. Almost like street attire. 
In terms of improvement, I think I might create some more feminines styles that might appeal to the female audience. 

Wednesday 26 December 2012

19. Second Set of Logos

Initial Ideas
I've finally used the my images in Illustrator to create a new set of logos. So far, I'm a lot happier with how these turned out. The logos itself don't look that exciting of professional, but they came out somewhat interesting. Here's what I created:


As you can see, the logos look more urban and have more a street style design to it. I'm not entirely sure what more I could do to it. But, so far I think that it's heading in a decent direction. I've been trying to be as enthusiastic about the project as possible, but like I mentioned before, Branding and Logo design just isn't my forte and I find it quite difficult. 


Here's an image of what my logos looked like with some colour and a few adjustments. Some of them don't look as readable as I would like them too but overall, they represent they idea of nature and urban life. 
I'm hoping that once I try them out on some clothing items, they might look a bit more appealing. 

18. Blowing The Paint!

Experimenting

This week was spent experimenting with Atomization. This is a process in which you blow ink or paint through a straw. Seeing as I didn't get the exact result that I wanted with the spray painting experiment, I decided to go ahead and try to achieve the results I want using an atomizer. 

Here's what I ended up with. So far, I'm quite happy with these experiments because I had slightly more control of the end result. I was able to blow more paint in certain areas than others to create the running paint effect that I want. I was also able to create splashed effects on some of the image and I quite liked the way that looked. 
Here's another image of how my experiment turned out. I wanted some splashes for my sub logos so I did some free blowing on some blank areas and made sure to create splashes that were runny. This is how it turned out! So far, I'm happy with the result. I'm hoping that once I use it in Illustrator, I could make it look more animated and softer. 

17. First Set of Logos!

Initial Ideas

I went ahead and used the set of spray painted paws to create a series of ideas for my logo. These are just some simple ideas that I may improve later on if they have some potential. Here's some of what I created:


You can see that I didn't create my own font for the logo and just downloaded something that I found on Dafont.com. I distorted the image slightly and added a few drips to make it look as if I was part of my spray painted logo. I'm certainly not happy with the overall turn of the experiments because it just looks messy and rushed. However, this is just the first set. I tried to create a completely solid idea with the same paw prints and here are some of the results:


These are the ideas that I came up. The colours are just some simple ideas but I'm still not entirely sure about the designs. I would like for it to look more solid and professional and just messy and splashed together. I still feel like I could think of more interesting ideas. But at the moment, I'm struggling a lot with the whole logo and branding project. I'm hoping the project will get easier at some point. Maybe when I've come up with a more stable idea. 

16. Spray Painting Experiment

Initial Ideas
I was inspired to try this idea when doing some brief research about what children are into lately. I noticed that kids were very much interested in urban arts and music, I've decided to lean   towards that sort of style. 
In order to incorporate images of nature into the design, I decided to use an image of an animal paw. I chose a wild animal such a wolf and cut it out of a card board sheet in order to make a stencil. I wasn't entirely sure how the whole experiment might turn out but I thought it might still be interesting to try it out. 
I was given a few cans of spray paint and some A3 sheets of paper so that I spray paint my paw stencil. Here's how my images turned out:


As you can the results of my spray painted paws aren't so bad. I definitely had fun creating the paws and experimenting with colours. 
After I've done a few more during the week, I'll see how I can use them and edit them on Illustrator. I'm not sure if I'll be using the same colours as the ones in the actually paw prints but I do like how it turned out. Once I showed the results to my tutor, I was advised to create more paw prints that have more running paint in order to create a more messy effect. Too much of a neat image might not look as child friendly. 
I'm hoping to create an effect similar to this image. 

15. What Do Kids Like?

Research

For the next few days, I'm going to spend time researching into the latest trends among children and children's media. I'm not entirely sure what kids are in to these days so I'm collecting a series of images and ideas that might help me understand what children are into. The images might inspire me to create something includes all of these things. I want to create a logo that kids will be able to relate to and familiarise themselves with. 

Here are a few images in fashion and music that I found.


I'm hoping to combine all of these sources to create something that kids will understand and easily recognise. I've decided to lean towards a sort of urban and graffiti style. Something that kids are used to seeing every time they step outside. Graffiti and urban art are the most popular with kids, so I'll try and create something along those lines. 

14. We've Gone Live!

Live Project

For the remained of the semester, we will be completing a live project. The project is based on a potential show for children ages 6 - 12 years old. The show will consist of out door activities such as sports and nature. So, we basically have to create a brand for the show that will go along with their outdoors theme. 

Logo design is not my forte.

Branding has never been of interest to me. I've always found it difficult to create logos and construct one simple simple that represents someone. When we ere introduced to the project, I wasn't exactly pleased, seeing as we had already covered branding in Year 1. 
Despite the fact I'm not too fund of the project, I decided to approach it with enthusiasm. I've already started conjuring up ideas for the logos and sub logos. 

Here are a few examples of the sort of logos that I will be looking at for inspiration. 


I've also been looking at a website that's filled with beautiful examples of logo designs. The site is called http://smashinghub.com/30-cool-illustration-logos.htm
So, I'll be using this site as inspiration also. 

13 Finalising My Editorial Project


Final Design For Editorial Project

I've finally finished my editorial project and created a short series of spreads including my front cover and back cover. Overall, I am somewhat satisfied with the turn out of my work. I would have liked if the spread was more vibrant and classy. But, with the way it looks, I believe that it may appeal to a very young audience such teenage girls. 

These were the spreads I was hoping to use for my final designs but I felt that they were too plain and simple for. For my final pieces, I decided to increase the size of my icons and spread them across the the left page. For thee Front cover, I made the collage slightly busier and increased the size of the images. As for the image with the woman, I decided not to use it and use my back up spread instead. 


Here's an image what my magazine spread turned out to look like. The images are simple, colourful and different. I would have loved if the front was a lot fuller and spread across both of the pages. 

My feedback for the spreads was exactly as I had expected it to be. I could have done a lot more to make the spreads look classy and "fashiony" but as I ran out of time, I became overwhelmed. 

Monday 24 December 2012

12 Front Cover

Final Front Cover Design

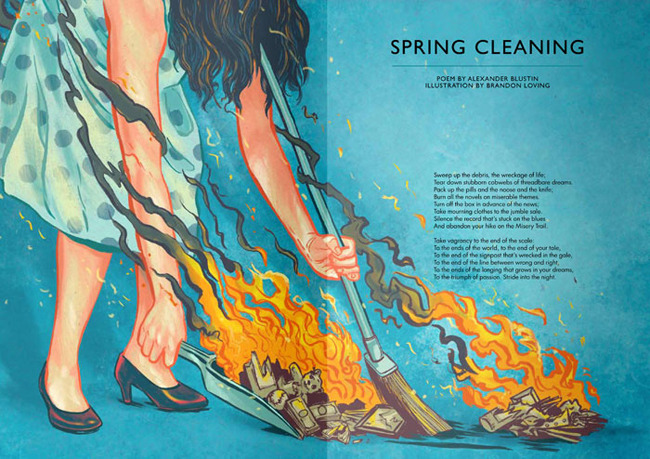
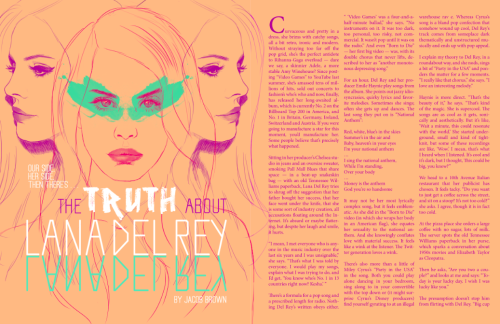
I've decided to create something that looks slightly abstract and also quite simple. I was inspired to create a collage front cover when browesing the internet for magazine front cover ideas. I saw the idea on the front cover of popshot magazine. Here are a few examples of the sort of idea I had for my magazine front cover. 

  
Popshot magazine are quite popular for being an illustration based magazine. They also use quite a few abstract images in their spreads and front covers. I've decided to lean in this direction for my magazine. Here, I'll show you the process I went through to create my collage front cover for my magazine.

Here, I cut out a few images from magazines, newspapers and such and then placed them in various positions in and scanned them. I would have added more to the collage but I thought I'd start of simple just in case the image didn't come out exactly how I'd visualised it. 


You can see that I also experimented with various background textures. I've also tried to shuffle some of the images around to create something different. After I had scanned the image, I went ahead and opened it up in Illustrator so that I could get on with some further experimenting. Here are a few images of what I tried in Illustrator in order to get some results.

As you can see, I've live traced the image and left it black and white. I wanted the image to look simple but leaving black and white was too plain and boring. So, I continued my experiment by using colours and mixing the collage with my other collage layouts. Here's an example of what I ended up with.


I like the look of the collage but I'm not too happy with how the overall double page turned out. It looks to plain and just placed there rather blended in and professional. I still left it as it is and decided that the next time I look at it, I'll create a more vibrant collage and possibly have the entire image blend in together. Overall, I'm happy with the experiments but I would be a lot happier if it turned out more vibrant.

11 Screen Print Please!

Front Cover Experiments

I've been exploring the idea of using a screen printed image as my front cover. Vintage bikes have been a trend in Bristol, so I'd like to focus the theme of my front cover on the spread as well the vintage bike trend in Bristol  I would like the spread to look quite rough and full of texture to illustrate a sort of vintage and grungy feel. 
In order to do this, I went to the screen printing room for a print session and experimented with a few of images to see if I actually liked the effect of the screen print. Here's what my images turned out to look like. 


As you can see I did end up with some slightly rough textures in my screen printed images. I wanted to screen print images in layers over each other to create a full portrait. But after this result, I decided to discontinue the experiment and focus on something else. The images didn't come out how i expected and the overall look seemed too plain in comparison to what i had in mind. 
I may come back to the idea again for my final major project but for now, I'm just going to leave this behind. Despite the fact that I wasn't too happy with the image, I still experimented with the screen prints. Here's what I created quickly on Illustrator. 

It isn't exactly what I had in mind but It looked interesting. 

10 Spreading Out Ideas!

Initial Ideas For Spread (2)

So far, I've created a short series of ideas I'd like to use for my final designs. They're still rough ideas and I haven't decided on anything solid but at the moment, I'm somewhat pleased with the outcome of the layout rather than the design. Here are a few examples of what I have done so far. 
This spread design is meant to be simple and not too overpowering. I wanted a lot of white space on the page to make sure that it's easy  to look at and the article is still visible and readable. The heading is a font that I downloaded from Da font online and thought that the tyre track texture really went well with the bike article. 
Here's the second page of the article. I'm approaching the second page of the article with simplicity here. Seeing as it's just a continuation of the previous page, I decided to keep the colours and the illustration consistent. The icons are images that I gathered online and traced on illustrator. I thought it might add a bit of excitement to the right side of the double spread rather than leaving it bare. 


Here's an optional third page that I created for the spread that I created for the project. I wanted the entire right page to be consumed with an image and for the left side to look less busy. The idea was to create something abstract and grungy. 

As you can see I browsed through a great deal of illustration themed magazines to get an idea of the sort of look I'm going for. I was more interested in getting simple looking illustrations that are straight to the point but still aesthetically pleasing. I didn't want the image to be too busy and messy.
Because I want the magazine article to appeal to woman with varied styles, I decided to create something that was diverse and not too feminine. A spread that consists of "girly" features but still tough and masculine in some aspects. 
I still have quite a bit to improve and clean up but, overall I'm somewhat satisfied with the outcome. It isn't exactly what I had in mind but it's getting there!

Sunday 2 December 2012

9 Illustration Themed Magazine?

Initial Ideas For Spread


For this week of my project, I've been struggling quite a bit with ways in which I can approach my spread design and layout. I have not been sure about what kind of design I want to do and theme.
After some throughout research into magazine design layout, I have decided that I would like to exclude photographic images from my spreads and instead focus on creating an illustration based magazine spread. Here are a few examples of the sort of spread that I am hoping to achieve. 
This is an example from the magazine, Popshot. Looking at the spread, I'm immediately drawn to the design and encouraged to read the article. I would like my spread to look something like this but with a much grungier and contemporary effect. I have been doing some research into the sort of spread that I would like to create. Here are a few examples of the sort of the design that I'm aiming for. 


I found these after doing some research. None of them have any interesting layout but the way in  which they use white spaces and spread the image across the pages is exactly what I'm going for. I would like to take advantage of white space and concentrate on actual design. At the same time, I don't want my image to be too overpowering. 
I'm looking forward to progressing with the rest of the project! Hopefully my experiments will turn out well and I'll be able to develop them further. 

8 Making My Own Font (Masthead)!

Designing My Own Font & Masthead

I decided that I would use a font that I have been designing for some time. It was meant to be used as my personal logo for self identity. I started off using some basic shapes on illustrator to create some simple structure. Here's an example of what I have been doing:


As you can see, I've just been experimenting with the idea of using blocks to represent city buildings or skyscrapers. But I've chosen to approach this in a more abstract way. I don't want it to look exactly like buildings because I would still like the masthead to be readable. 
So far, I'm very happy with the end result of my font design and I'm definitely considering it as my final idea for my magazine masthead. I wanted it to look a slightly more defined and possibly less compressed. I've tried to experiment with colour also. So far, I've only tried using various shades of pink and grey to illustrator the femininity of my article and spread. 


I don't like the way the way the colours have turned out. It could be due to the fact that the colours are to harsh and solid. I'd like to try something on a more pastel tone. Towards the end of my experiments in the image above, you can see that I was trying to work with more softer and faded colours but I still wasn't happy with the results. 
In the end I went with something simple and readable. Here's the result of my final outcome. 

Because of the simplicity of the masthead, I've decided that every issue could have a different colour masthead on the cover. This makes the masthead a lot more versatile and exciting to work with. I was inspired to work this way when I  saw the front covers of Varoom magazine. I noticed that their masthead looks quite similar to my design! They also change the design of masthead slightly with every issue.